
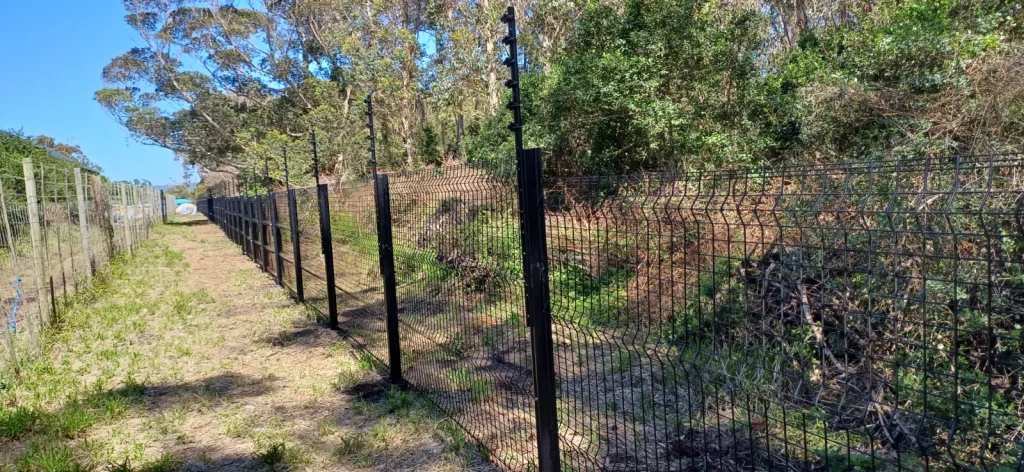
A professional electric fence installation follows the same steps every time: survey, plan, brackets, wire, earthing, protection, energiser, testing, certificate and handover. Skip one and the fence works on the day, then gives trouble at the first storm or the first dry winter.
Here is what each step involves, and what to look for in a quote. The example throughout is a real job: a 2.4 m clear view perimeter at a coastal estate in Plettenberg Bay.
Step 1: the survey decides everything that follows
Before anything is quoted, someone walks the boundary.
- Length and shape: corners, slopes, gates and where vehicles cross.
- What the fence sits on: a wall, palisade, clear view mesh, or its own posts.
- Power: where the energiser can go, and whether there’s mains power there.
- Conditions: sea air, open ground for lightning, trees and plants near the line.
- Rules: public areas, warning signs, estate rules and neighbours’ walls.
At the Plettenberg Bay estate, the survey found salt air, a line that climbs and drops through dunes down to the beach, and no power along most of the boundary. Each of those changed the materials and the plan.
Step 2: a plan with zones, not one long fence
A long fence should be split into zones, so a fault shows you which part to check. The plan also sets where the energiser goes, how many strands each section needs, and where the gates and corners are.
At the estate, the fence was split into two zones on two energisers, which also gave more power on the stainless wire.
Step 3: brackets and posts fixed for the surface they’re on
- On a wall: brackets fixed into solid brickwork, straight or angled no more than 45°, never over a neighbour’s property without their consent.
- On palisade or clear view: brackets that clamp or slot onto the posts. At the estate, galvanised, plastic-coated omega brackets slot into the clear view posts, so nothing is drilled and the coating stays sealed.
- Freestanding: strong strainer posts at the ends and corners, and intermediate posts in between.
- Steep sections may need more strands to close the gaps. At the estate, 9 to 12 strands sit on top of the 2.4 m mesh, with 12 on the steep parts.
Step 4: the right wire, tensioned properly
The wire is chosen for the length and the conditions. Near the sea, ordinary wire and fittings rust, so the estate got 1.2 mm braided stainless-steel wire with stainless ferrules, tensioners and spring hooks. Inland, the choice is usually between aluminium, steel and the wires in between; see our electric fence wire guide.
Every strand is tensioned so it can’t sag onto its neighbour, and every joint is made with the right connector, not twisted by hand.
Planning a new fence? See electric fence installation.
Step 5: earthing, lightning protection and signs
- Earthing: enough earth spikes, properly connected. The estate is earthed every 30 m with copper-coated earth spikes.
- Lightning protection: lightning diverters and surge protection, so a storm surge has a short path to the ground instead of through the energiser.
- Warning signs: yellow signs along public roads and paths, no more than 10 m apart, and at the gates.
- Gate contacts, sirens and strobe lights where the plan calls for them.
- No electrified razor or barbed wire. The standard doesn’t allow it.
Step 6: the energiser, backup power and the alarm link
The energiser is mounted where it’s protected and can be serviced, with battery backup so the fence keeps working through power cuts. Its alarm outputs are linked to the house alarm and, from there, to your armed response company, if you want that. App alerts on your phone are an option too.
Step 7: testing every zone, then the certificate
The fence is tested zone by zone: the voltage on each line, the earth, the alarms and the gate contacts. Only when it passes is the electric fence certificate issued, by an installer registered with the Department of Employment and Labour, which you’ll need when you sell.
Step 8: a proper handover
You should be shown how to arm and disarm it, what each alarm means, where the zones are, and what to keep clear of the wires. You get the certificate and a written record of what was installed.
Electric fence connection diagram, in words: live out, back to the return, earth to the spikes
No drawing here, so this is how a typical monitored wall-top or freestanding fence is wired to a Nemtek energiser.
| Part | Connects to | Why |
|---|---|---|
| Live terminal | The live wires | Sends the pulses out |
| Return terminal | The far end of the live run | A cut drops the voltage coming back, and the alarm sounds |
| Earth terminal | Earth spikes by the energiser; the fence earth wires join there | Live and earth touched together: a shock and an alarm |
| HT lead-out cable | Terminals to fence, through walls and under paving | Insulated; never shares a conduit or hole with low-voltage wiring |
| Under-gate HT cable | One section to the next, under the gate | The gate opens without breaking the circuit |
| Gate contact | The energiser’s gate input | Alarm if the gate stays open past a set delay |
| Zones | Own live and return terminals each | The keypad shows which zone faulted |
| Siren and relay | Siren; relay to a zone on your alarm panel | Your alarm knows too |
| Lightning diverter | Between energiser and fence, within 2 m of an earth spike | Sends a surge to ground |
| Warning signs | Fence posts or wires | The standard asks for yellow signs at gates and no more than 10 m apart along public roads |
- Drive the main earth spikes by the energiser. Nemtek’s manuals ask for at least three, at least 1 m deep and at least 2 m from any other earth (10 m on farms).
- Run HT cable from the terminals, through the lightning diverter, to the fence.
- Run the live wires out and back to the return terminal, one loop per zone.
- Cross each gate in under-gate cable and fit the gate contact.
- Link the relay to the alarm panel, then test each zone for a short and a cut at its far end.
This is how the work is done, not a DIY guide. It’s high-voltage work, and only a registered electric fence installer may issue the electric fence certificate (EFC or COC).
See the full job
The Plettenberg Bay estate, about 1,200 km from our Walkerville base, shows every step above on one site, with solar camera poles added along the same fence: the Plettenberg Bay coastal estate job.
How we quote an installation
Send us photos of the wall or boundary, or a Google Maps outline, and tell us what the fence must do. We survey the site and give you a written quote that names the brackets, wire, energiser, zones and lightning protection. We never go over the quote without your OK. Our electric fence price guide shows our starting prices per metre and what moves them.
WhatsApp us a photo of the boundary or call 083 659 0957. We’re in Walkerville and install electric fences across the Midvaal, Joburg South and the rest of Johannesburg.
Questions people ask
How long does an electric fence installation take?
It depends on the length, the surface and the number of gates. A house wall is usually a short job; a long estate perimeter takes weeks. You get the time frame with the written quote.
What’s included in an electric fence installation?
A survey, the brackets or posts, the wire, the energiser with battery backup, earthing, lightning protection, warning signs, testing every zone, and the electric fence certificate. Linking it to your alarm and armed response is usually part of it too.
Can an electric fence go on top of an existing wall or fence?
Yes. Brackets fix to a solid wall, or clamp or slot onto palisade or clear view posts. The installer checks that the surface is sound before fitting.
Do I get a certificate with a new electric fence?
You should. Whoever installs a fence must make sure the electric fence certificate is issued, and only a registered installer may issue it, once the fence passes its test.
Why split an electric fence into zones?
So a fault or an alarm shows you which part of the fence to check. On long fences it saves a walk round the whole boundary.
How is an electric fence wired?
The energiser’s live terminal feeds the live wires through high-voltage cable, and the far end of each zone comes back to its return terminal, so a cut wire sets off the alarm. The earth terminal goes to at least three earth spikes by the energiser, where the fence earth wires join. Gates are crossed in under-gate cable, and only a registered electric fence installer may issue the certificate.